Little glass lanterns and candle pedestals from Dollar Tree


Found these cast plaster candle pedestals at Dollar Tree a couple of weeks ago. I only bought 2 black ones, but they had white also; BUT the white ones had very noticeable ‘seams’ so I decided to skip them. (you could easily sand down the protruding part of the seams with sand paper though) As you can see, these chip super easily. I was planning to repaint mine, so I didn’t really care. The new paint will cover the chips, and a coat of varnish will help prevent future chips.
I bought a few of these little turquoise glass candle lanterns the same day. They fit perfectly atop the pedestals, but I probably won’t use them for such a predictable purpose.


I’ve used some similar frosted white glass lanterns (also from DT) for these upcycled fencing candle chandeliers that I made recently. I did not permanently attach the lanterns to the fencing, so they are easily removable for transport. You can use regular or battery operated tea lights in the.


Here’s what I did with my two black pedestals. Added another coat of black paint, tied on an old key with a piece of sheer black ribbon; glued a folded sheet music ‘rosette’ to the top of the pedestal; then glued on the plastic skulls. (from DT)
I’m really TRYING to not stockpile so many craft supplies, and use up what I have on hand. But if you shop DT as often as I do, you KNOW that if you don’t buy ‘as many as you think you will ever need’ of an item that catches your eye; you will never find them there again. MOST of the time. Every so often the desirable item will be something that they will be regularly stocking . . . but NEVER ‘expect; to find it again and you will never be disappointed.


Forgot to take pictures of these ’rounded bottom’ DT glass lanterns before I embellished them. They had several colors, I bought one clear and one turquoise. Had some very OLD DT mini jar candles is little ‘shot glasses’ that fit perfectly inside these; then I added a few inches of colored gravel (also from DT!) and tied on a few shells with baker’s twine of jute. For the shells, I glue a small piece of the string to each shell, the bundle them and tie them on with the longer strip. And yes, DT does sell jute and baker’s twine; but I think I got the aqua baker’s twine elsewhere.


Did you notice these little jars of shells in the display photo? YEP! Got them at DT too. I added the limpet shell to the cork lid.


I filled some vintage glass spice jars with ‘beach glass’ and tied sheer ribbon around the necks. (no lids for the spice jars). The beach glass is the last little bit that I had left over from YEARS ago when DT carried it. I probably bought FIFTY bags of assorted colors of the beach glass from DT, and used it to make beach glass wreaths.
")
")
")


The beach glass (or Sea glass, if you prefer) wreaths are TRULY a ‘Labor of Love’. Each one took at least 20 hours to construct, and contains nearly a dozen layers of carefully positioned and fitted together glass. I’d guess there are at least a thousand pieces of glass per wreath. I used tacky glue to adhere mine. Hot glue would never hold up under the weight of the glass.
Uh-oh!! The sun is coming out! I might have to put on my rain boots and get outside and rake up all the pine needles in my yard!
NEW color od Easter eggs at Dollar Tree
LOVE these new ‘gold leaf’ plastic Easter eggs I found at Dollar Tree!


They had small eggs in a package of 36, and medium and large eggs on picks for use in floral designs. I don’t do florals, but loved this egg color, so I bought one package of each of the egg picks as well as several bags of the small ones. Figure I can come up with SOMETHING to use the bigger ones for!


On these closer up photos, you can better see that the eggs are gold leafing over a pink base. Time to decide on a project for using them!


In past years I had used other kinds of eggs and moss in vintage bell jars.

I just so happened to have a stash of bell jars on hand (they are ‘one of those things’ that I’m always on the look-out for.) and thought the idea was worth replicating with this updated egg color.


I didn’t care for the moss with the gold eggs, so I decided to try some of my ‘hand folded and hand cut vintage book pages paper shred mixture’. Added in a bit of craft brown paper along with old yellowed book pages and whiter pages. The combination of the three colors worked perfectly!


I had three sizes of the vintage bell jars and three sizes of eggs, soooooooooooooo . . . I put the small eggs in the small jars, medium eggs (which easily pulled right off the wood pick!) in the medium jars and large eggs in the large jars.


I finished off ‘the look’ with a sheer gold ribbon tied around the handle.

I also packaged up some of the small eggs with some paper shred for those who want to create their own little nests.


Displayed them in my booth along with some little birds. These jars look great sitting atop candle pedestals too; as shown above.
What do YOU think? Gold eggs for Easter. Yeah or Hay?
More BIG Dollar Tree Snowflakes
I’ve had these assorted snowflakes in my ‘craft stash’ for TOO long. It was time to ‘Use them or Donate them’. The REASON they have been just ‘sitting there’ for so long was because I couldn’t think of anything to DO with them. Giving myself an ultimatum seemed to do the trick!! I left them sitting in plain sight for a week and finally came up with some ideas!


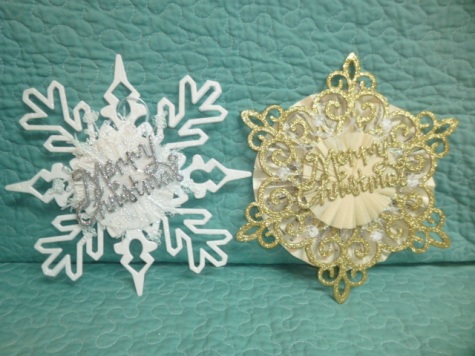
I had some white snowflakes and some gold ones; both about 10″ across. (I forgot to take pics before I added stuff!)

On these I added an 8″ aqua paper doily, a hand folded white crepe paper rosette, a small white snowflake, a turquoise JOY glitter ornament and a small white snowflake foam sticker in the middle of the ‘O’. I had all of these supplies in my stash, and all of them came from Dollar Tree.

I had quite a few of the big white snowflakes, so I made a few different styles.

On this one I added a 6″ clear plastic snowflake first, then a white hand folded crepe paper rosette, and a silver glitter ‘Merry Christmas’ ornament to top it off.

I topped a couple of them with BIG red glitter ‘Believe’ ornaments.

On these I just did a BIG hand folded vintage sheet music rosette, mounted on the back. I use tacky glue for gluing all these things together.
I did the big vintage sheet music rosettes on the back of some of the gold glitter snowflakes.

A few more layers on this one than the red ‘Believe’ one.

Sheet music rosette behind the gold glitter snowflake. An 8″ clear snowflake on top of the gold glitter; a cream color hand folded crepe paper rosette, then a gold glitter ‘Merry Christmas’ ornament.

Sheet music rosette on the back of this one also.

8″ clear white plastic snowflake on top of the gold; topped with a white glitter “JOY” ornament and some white foam snowflake stickers.

I did a smaller vintage sheet music rosette on this one.

I put one of the big plastic snowflakes on top of the gold snowflake; then the sheet music rosette; topped with the gold and sliver “Merry Christmas” ornament.


Two kinds of snowflakes; six styles of wreaths!
BIG Dollar Tree Snowflake ‘wreath’

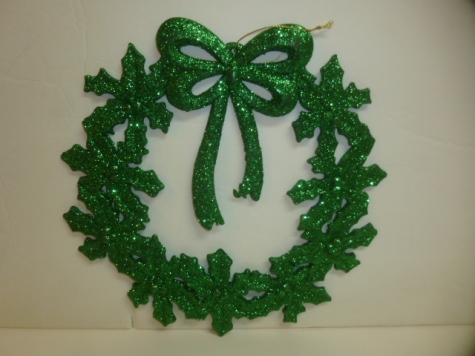
Big 18″ acrylic snowflake from Dollar Tree. (I used TOW of them, and ‘offset’ the points for more fullness) Smaller silver glitter covered cardboard snowflake, also from DT. Hand crafted vintage sheet music rosette topped with a silver glitter “Merry Christmas” DT ornament. (the Merry Christmas ornaments come in a five pack).

A little bit of glue, $3.20 worth of supplies and about five minutes is all it took to create this simple ‘wreath’.
Dollar Tree Reindeer

You can’t tell from the picture, but these glittered reindeer that I found at Dollar Tree are BIG! I didn’t measure them, but they are about 15″ x 22″. They came in silver, Platinum and red glitter. I didn’t care for the red reindeer, so I only bought the silver and Platinum colors.

bought these bags of little jingle bells at DT also. This was the smallest size bells they had; which came 50 to a bag. There were 2 more bigger sizes in the bags. Then, as they always have, the BIG jingle bells with the snowflake cutout that come 9 to a cello box. They also had all four bell sizes in red, green, silver and gold. I bought several packages of ALL sizes and colors; but mostly RED!

And here is how I ‘dressed up’ the silver reindeer. I glued on black satin ribbon in the shape of a harness; then added jingle bells.

I forgot to get pictures of the other ways I decorated them; but I did some with just one red jingle bell on the nose (Rudolph!) And some with red bells strung around the neck.
with as inexpensive as these were, you could easily afford to buy enough to create Santa’s entire reindeer team to place on your mantle and the wall above!
I bought at least two dozen of them and sold nearly ALL of them at a Holiday Craft show.
Dollar Tree Glitter Holly Wreath
Found these solid green glitter holly wreaths at Dollar Tree.
They are about 12″ across and came in solid red glitter too. I only bought the green because ‘red holly leaves’??? Um. No.

Super quick and easy to spruce up! I glued (using tacky glue) little red jingle bells on top of the raised ‘berry’ spots. And then glued a red glitter “Merry Christmas” ornament at the top, over the bow. (also using tacky glue)
**** A word about ‘glues’. I am not a big fan of hot glue. I ALWAYS get burned at least once, EVERY time I use it; and I HATE the strings! (yes, I KNOW you can get rid of the strings with a hair dryer. I still hate having to deal with them!!) So, I use tacky glue whenever possible.
On these wreaths, I applied the dots of tacky glue on top of ALL the berry spots at once. This gives it a minute to start to ‘set’. It really only takes a few seconds to begin to set. Then I added all my bells and let it dry flat overnight. The next day, I added the Merry Christmas ornament the same way.
Tacky glue also holds up better to extreme heat or cold; whereas hot glue tends to harden and crack and crumble over time. Stepping off my glue soapbox now.

Perfect, no?

The bells at Dollar Tree come on FOUR sizes. The biggest ones in a 9-pack. Then they have bags of them in three smaller sizes. The smallest ones (which is what I used on this wreath) have 50 per bag. I buy several of each size of the red bells and put them on EVERYTHING!! All four sizes of bells come in red, green, silver and gold. And yes, I have a stash of ALL four colors!

Red and green vignette in my booth. The big jingle bells sell well individually priced too. have a bowl and jar of them.

Those same red glitter ‘Merry Christmas’ ornaments were the perfect addition to some ‘snow globe’ apothecary jars I made using Dollar Tree supplies too.

These turned out really cute!

I actually bought the supplies for these a year or two ago; and just got around to using them this year. The white glitter deer is an ornament, but it did stand on it’s own, I used wire cutters to cut off the to hanging loop on the antlers. The snow came from DT also. The little bags they used to sell with the Christmas Village stuff. (Which, by the way, I have NOT seen any of the Christmas Village stuff at DT this year?!?)

The trees were also from the Christmas village stuff; they are a little more ‘lime’ green than dark forest green. They came in a two pack, two sizes. I used one of each size in these jars.

I made one square jar too. On this one you can better see how far up I filled the snow. First I applied a thin layer of tacky glue on the entire inside base of the jar, to hold some of the snow in place. But BEFORE I poured the snow in, I added the trees and reindeer. Put a good size ‘glob’ of tacky glue on the bottom of each tree and positioned them. Did the same with the reindeer. (if your jar opening is not big enough to fit your hand inside, use a pair of pliers to lower them into place and position them, as needed. Then before your tacky glue dries, pour in an inch or so of snow.

A little red snowflake that I had in my stash was perfect to place on top of the lid. I used green satin ribbon to tie the red glitter “Merry Christmas” around the neck of the jar.

Classic red and green Christmas decorations.

~::~

~::~

Dollar Tree mercury glass lanterns

These mercury glass style pint size glass jar lanterns with wire handle are perfect ‘as purchased’ from Dollar Tree.

Still, I prefer to always add a ‘little something’ to dress them up a bit . . . and as an inspiration to others. Most of the time I just rummage through the embellishment supplies I have on hand to find those little somethings. In this case, I had some blue METAL snowflake charms that I tied on with some satin ribbon.

Whenever possible, I make the added embellishments ‘removable’, just in case the purchaser has a different vision for using them. These are easily removable by just untying the ribbon.
They also had gold and red colors of these mercury glass lanterns. I usually add a tea light or batter tea light to them before I put them out for sale in my booth or at a show. It’s just a little extra ‘nicety’ that doesn’t cost hardly anything to add on.
Looat I found at Dollar Tree!

Little black wire Halloween trees! Just one per package, but still not a bad price. Haven’t decided what to do with them just yet. They also had ALL the stuff it set up an entire “Halloween village”, like the Christmas village stuff. You could paint these ANY color. I might cover mine with black GLITTER!
 It was utterly IMpossible to get a picture of these without a glare from the flash! They look MUCH prettier in person. They had a few different styles of these ‘Mercury glass looking’ votive holders and in silver as well as the gold, which I bought.
 These will be pretty for a Christmas table centerpiece or even WEDDING or anniversary table decor!
CHEAP (almost free!) TRICK
It’s spring and I love making, selling and decorating with bird themed things, including nests with EGGS in them.
 Things like this. I can buy the nests pretty inexpensively, in bulk from a wholesale supplier (CWI, but you do have to have a retail license to buy from them) and the moss to fill out the nest from Dollar Tree. But the EGGS??? The eggs are ridiculously expensive!!

Tiny ‘mini jelly bean’ sized ones are $3+ at the craft store. And they are not even very realistically looking, with a very visible ‘seam’ where the two sides have been joined. (you can ‘sand off’ those seams with a nail file!)

I use the little eggs in wall collages like this. (the birds came from DT.) And package the nests with eggs to sell individually. With as many eggs as I use, I HAD to come up with a less costly egg supply.
 HERE is my solution! This was NOT my own original idea; but it was SO long ago that I came across it on the internet that I can’t remember WHERE I saw it. (I always try to give credit where credit is due! If you happen to know who originated this idea PLEASE let me know so I can credit them!) Can you tell what these ORIGINALLY were??
 They’re PISTACHIO shells!!! Crazy cool, eh?!?!? By the time you glue them into a nest you really can’t even SEE the other side, so why not!?!
Just save up a bunch of Pistachio shells. Lay them open side down in a box (I use the low side boxes, like 4 six packs of soda come in) You want the paint to easily reach them, but don’t want them to ‘blow away’ from the force of the spray! Since them are so small, it is easier to use spray paint. I probably did over a hundred of them at once.
I used white, cream, pale blue and light green paints all in really quick short spurts. This will give you the most natural coloration of your eggs. Once dry, you can add your speckles. You can read about speckles and the splattering tool that I used HERE. It really is a pretty handy little tool. I’ve TRIED to add the ‘fly speckling’ with an old toothbrush and ended up with BIG BLOBS instead of tiny specks. But if you have a method that already works well for you. bu all means do it your way!
 Adding a feather to the nests is a nice added touch.
Little glass jars
Since ‘good crafting stuff’ has been harder to find at the dollar store, I’ve been looking at the craft stores a little more. Found these cute little glass bottles at Michael’s.
 Very ‘vintage’ shape; came in just these two colors. (was HOPING for aqua ones too!)
 Grabbed a few of these little key charm packets.
 And these little embellishment sets.
 A snippet of scrapbook paper and some string or muslin and a little key turned the bottles into mini works of art!
 Just be sure you really secure the keys in place or they will disappear!
 On this bottle the key is GLUED on as well as tied on.
 Here are some other bottles (thrift store finds) that I embellished.


 Old spools of string are fun to embellish too.

On these I used some wired tissue paper ribbon. Hard to work with. Liked the prints on them but NOT working with the wire. And the wire made it tear really easily if you tried to make a bow out if it. Lesson learned. Wired tissue ribbon LOOKS cool, but it’s JUST for looks!

For most of the rest of these, I hand stamped tea stained paper.
 The old yellowed book pages I used as the background on these three bottles was VERY brittle. Even just applying glue to them caused them to tear. My remedy: Took them outside and sprayed them with a couple of quick coats of clear spray on varnish! Still had to handle it very carefully, but it made it strong enough to glue in place.
 Another recent batch of thrift store bottles.
 Scraps of scrapbook paper for the label. (I LOVE all the different papers with writing on them; even the stuff that is illegible looks cool!)
 Another little strip of paper and some jute twine around the neck and a vintage repro key.

More of my favorite papers with a snippet of old dictionary page sandwiched between.
 Sheet music scrap and white twine around the neck, and a vintage repro key charm.

More of the writing scrapbook papers, and a paper repro clock face (from a booklet of such assorted things)
 Scrap of paper and some bakers twine on the neck of this one; and a key charm.
 All these bottles are in my booth at Stars Antique Mall in Portland.
